ShopDreamUp AI ArtDreamUp
Deviation Actions

In this guide, I will teach you how to create your own "City Fashion" design. So just follow the step-by-step instructions below to get started.
1. To start, we will first setup the document. For the sake of this tutorial, let's design a poster. You can however, apply such a design on brochures, postcards and booklet or magazine covers as well. Once you open Adobe Photoshop, press CTRL+N to create a new document. In the window that opens, set the proper poster dimensions that you want for your poster file. You will also need to set a resolution of at least 300ppi if this is for high quality printing.

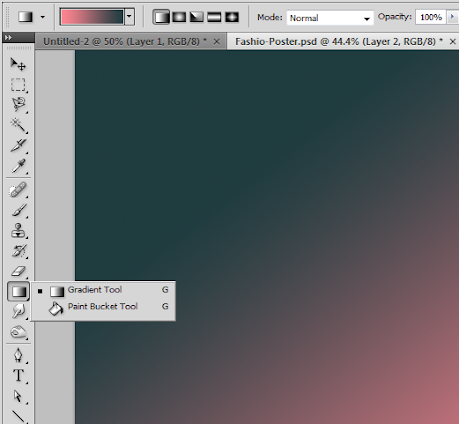
2. Now that the new document is open, we paint out background black using the paint bucket tool as the base. Then, create a new layer by pressing CTRL+SHIFT+N. Name this Gradient. Using the gradient tool (Shortcut G), place a color gradient with two of your theme colors diagonally unto the canvass like so. Set the opacity of this layer to 65%.
3. Now, create another layer. Name this one clouds. Make sure that you are back to your default colors by pressing (D). Then go to Filter -> Render -> Clouds. Once the clouds are rendered, set its blend mode to multiply.

4. Now, we create a new group in the layers panel by clicking on the "new group" icon below the panel. Then, we drag both our gradient and color layers into it. For the group itself, we change its blend mode to Normal and change its Opacity to 65%. Afterwards, we right click on the group and select merge group. By doing so we preserve the opacity values of the layers to get the cloud group that we want.

5. Duplicate our merged layer by pressing CTRL+J. With the duplicate selected, go to Filter -> Blur -> Motion Blur. In the window that opens, set the Angle to 90 degrees and the distance to 600 pixels.

6. We then change this duplicate's blend mode to "Soft Light".

7. Then we paste in the image of a city at night. Scale the city image by selecting it and Pressing CTRL+T (Transform). You can right click on the transform box to get the different transform options, however just scaling option is the most important mode that you will want. Hold down the shift key as you reduce or increase the size so that the proportions are preserved. Using the eraser or the magnetic lasso tool, erase the sky as needed.

8. Now, double click on our city layer to access the layer styles window. Click on the option for "Gradient Overlay". Change the settings as follows.
a. Blend Mode: Hue
b. Gradient Color: The same gradient color you used originally for the background
c. Angle: 90 Degrees

9. Once done, we should have something like this now:

10. Now, you will need to duplicate the city later two times. You can do this easily by pressing CTRL+J twice. Merge these layers so that the gradient overlay gets integrated into one layer. Then duplicate that layer again once. The result should give you 3 main layers. We have named them here City Top, City Bottom and Main (the one with the gradient overlay still active).

11. Now, double click on "City Top". Go to the layer styles window and click on "Gradient Overlay". Change the settings to these values.
a. Blend mode: Overlay
b. Gradient: Pink to Orange
c. Angle: 120 degrees

12. Next, enter the quick mask mode by pressing "Q". Then using a fuzzy brush, paint up the areas that you want to be highlighted and motion blurred in the cityscape. The best spots here are the top parts of the buildings, most especially the ones with brighter lights. The selection area should turn red. Do not worry about this.

13. Press "Q" again or click the quick mask icon to see the outside area of the brush you painted turn to a selection. Press CTRL+SHIFT+I to invert the selection and select what we want. With the area selection ready, just click on City Bottom to select it.

14. Then Press CTRL+C and CTRL+V to copy and paste the selection from city bottom. With this new layer selected, go to Filters -> Blur -> Motion Blur… Use a 90 degree angle and as for the distance, use a value that is appropriate for your design. The higher the value the higher those light streaks reach. Here we used 800 pixels.

15. Now, duplicate this layer 4-6 times depending on how thick you want the streaks to be. Merge those duplicates into one again and bring them to the top layer.

16. Double click on this streaks layer. Add a pink and white color gradient. Here are the settings:
a. Blend Mode: Overlay
b. Color: Pink to White
c. Angle: 90 degrees

17. Once you press ok, change the blend mode of the actual layer to Lighten and reduce its opacity to 75%. If you think some parts of the city have too much streaks, simple create a layer mask on the streaks layer and then use a soft black brush to remove small parts of the streaks.

18. As the final touch for our background, create a new layer on top of everything. Then use a soft black brush and paint the bottom area black, blending seamlessly with the bottom part of our city.

19. Great! Now, it is time to insert our model. Paste in our model picture just behind the black layer that we just made. For this example we have already processed this model image by removing its background. We used a mixture of the Magnetic Lasso tool and the Magic wand tool to get the model's background out, just like what we did with the original sky of the city.

20. Then, we will adjust the lighting of the model image. Go to Image -> Adjustments -> Curves. In the graph that opens, adjust the curves so that it looks almost like the curve below. It does not have to be exact. The point here is to make the darker values in the image more intense and emphasize the lighter ones. Also, this removes and noisier elements that the original image had.

21. Next, we will use some free glass shards images from this site: www.officialpsds.com/Shattered… will add a more grungy shattered effect to our mode. We just paste in the glass shards in the free resource just behind our model layer. We de-saturated it by pressing CTRL+SHIFT+U and then rotated it by pressing CTRL+T for transform.

22. Now, duplicate this shattered layer and hide the original for now. Using the duplicate, transform it to a smaller size that fits our model. Then hold down the CTRL key and click on its thumbnail to select its image areas.

23. Next, this is the important part. With this area selected, click on the Model layer. Then press CTRL+J to duplicate the model layer, but with only the selected shard areas. Once the duplicate is done, shift the location of this shard-model layer on top of the main model. Then use the arrow keys 1-4 pixels to the left and 1-4 pixels to the right. This gives you a model slightly being broken to pieces.

24. Now, remember the duplicate layer we left earlier of the glass shards? Just make it visible again, then duplicate it 2-3 more times and move it across the background. Merge all of those layers. Then, use a hard eraser tool to erase some of the glass, shaping it so that some parts of the shards becomes our mode's wings.

25. Now, duplicate this shard wing layer. On the duplicate, add more gradient colors from your color theme. Change the blend mode to Multiply.

26. Then, bring the original shard layer in front and then with a soft and large eraser, erase the area just at the edges of the shards to bring in the color underneath.

27. Finally, using the text tool we just add in the poster title. Here we used some creative font styles for an easy stylized effect.

28. Great! Now you are done with our city fashion poster.

1. To start, we will first setup the document. For the sake of this tutorial, let's design a poster. You can however, apply such a design on brochures, postcards and booklet or magazine covers as well. Once you open Adobe Photoshop, press CTRL+N to create a new document. In the window that opens, set the proper poster dimensions that you want for your poster file. You will also need to set a resolution of at least 300ppi if this is for high quality printing.
2. Now that the new document is open, we paint out background black using the paint bucket tool as the base. Then, create a new layer by pressing CTRL+SHIFT+N. Name this Gradient. Using the gradient tool (Shortcut G), place a color gradient with two of your theme colors diagonally unto the canvass like so. Set the opacity of this layer to 65%.
3. Now, create another layer. Name this one clouds. Make sure that you are back to your default colors by pressing (D). Then go to Filter -> Render -> Clouds. Once the clouds are rendered, set its blend mode to multiply.
4. Now, we create a new group in the layers panel by clicking on the "new group" icon below the panel. Then, we drag both our gradient and color layers into it. For the group itself, we change its blend mode to Normal and change its Opacity to 65%. Afterwards, we right click on the group and select merge group. By doing so we preserve the opacity values of the layers to get the cloud group that we want.
5. Duplicate our merged layer by pressing CTRL+J. With the duplicate selected, go to Filter -> Blur -> Motion Blur. In the window that opens, set the Angle to 90 degrees and the distance to 600 pixels.
6. We then change this duplicate's blend mode to "Soft Light".
7. Then we paste in the image of a city at night. Scale the city image by selecting it and Pressing CTRL+T (Transform). You can right click on the transform box to get the different transform options, however just scaling option is the most important mode that you will want. Hold down the shift key as you reduce or increase the size so that the proportions are preserved. Using the eraser or the magnetic lasso tool, erase the sky as needed.
8. Now, double click on our city layer to access the layer styles window. Click on the option for "Gradient Overlay". Change the settings as follows.
a. Blend Mode: Hue
b. Gradient Color: The same gradient color you used originally for the background
c. Angle: 90 Degrees
9. Once done, we should have something like this now:
10. Now, you will need to duplicate the city later two times. You can do this easily by pressing CTRL+J twice. Merge these layers so that the gradient overlay gets integrated into one layer. Then duplicate that layer again once. The result should give you 3 main layers. We have named them here City Top, City Bottom and Main (the one with the gradient overlay still active).
11. Now, double click on "City Top". Go to the layer styles window and click on "Gradient Overlay". Change the settings to these values.
a. Blend mode: Overlay
b. Gradient: Pink to Orange
c. Angle: 120 degrees
12. Next, enter the quick mask mode by pressing "Q". Then using a fuzzy brush, paint up the areas that you want to be highlighted and motion blurred in the cityscape. The best spots here are the top parts of the buildings, most especially the ones with brighter lights. The selection area should turn red. Do not worry about this.
13. Press "Q" again or click the quick mask icon to see the outside area of the brush you painted turn to a selection. Press CTRL+SHIFT+I to invert the selection and select what we want. With the area selection ready, just click on City Bottom to select it.
14. Then Press CTRL+C and CTRL+V to copy and paste the selection from city bottom. With this new layer selected, go to Filters -> Blur -> Motion Blur… Use a 90 degree angle and as for the distance, use a value that is appropriate for your design. The higher the value the higher those light streaks reach. Here we used 800 pixels.
15. Now, duplicate this layer 4-6 times depending on how thick you want the streaks to be. Merge those duplicates into one again and bring them to the top layer.
16. Double click on this streaks layer. Add a pink and white color gradient. Here are the settings:
a. Blend Mode: Overlay
b. Color: Pink to White
c. Angle: 90 degrees
17. Once you press ok, change the blend mode of the actual layer to Lighten and reduce its opacity to 75%. If you think some parts of the city have too much streaks, simple create a layer mask on the streaks layer and then use a soft black brush to remove small parts of the streaks.
18. As the final touch for our background, create a new layer on top of everything. Then use a soft black brush and paint the bottom area black, blending seamlessly with the bottom part of our city.
19. Great! Now, it is time to insert our model. Paste in our model picture just behind the black layer that we just made. For this example we have already processed this model image by removing its background. We used a mixture of the Magnetic Lasso tool and the Magic wand tool to get the model's background out, just like what we did with the original sky of the city.
20. Then, we will adjust the lighting of the model image. Go to Image -> Adjustments -> Curves. In the graph that opens, adjust the curves so that it looks almost like the curve below. It does not have to be exact. The point here is to make the darker values in the image more intense and emphasize the lighter ones. Also, this removes and noisier elements that the original image had.
21. Next, we will use some free glass shards images from this site: www.officialpsds.com/Shattered… will add a more grungy shattered effect to our mode. We just paste in the glass shards in the free resource just behind our model layer. We de-saturated it by pressing CTRL+SHIFT+U and then rotated it by pressing CTRL+T for transform.
22. Now, duplicate this shattered layer and hide the original for now. Using the duplicate, transform it to a smaller size that fits our model. Then hold down the CTRL key and click on its thumbnail to select its image areas.
23. Next, this is the important part. With this area selected, click on the Model layer. Then press CTRL+J to duplicate the model layer, but with only the selected shard areas. Once the duplicate is done, shift the location of this shard-model layer on top of the main model. Then use the arrow keys 1-4 pixels to the left and 1-4 pixels to the right. This gives you a model slightly being broken to pieces.
24. Now, remember the duplicate layer we left earlier of the glass shards? Just make it visible again, then duplicate it 2-3 more times and move it across the background. Merge all of those layers. Then, use a hard eraser tool to erase some of the glass, shaping it so that some parts of the shards becomes our mode's wings.
25. Now, duplicate this shard wing layer. On the duplicate, add more gradient colors from your color theme. Change the blend mode to Multiply.
26. Then, bring the original shard layer in front and then with a soft and large eraser, erase the area just at the edges of the shards to bring in the color underneath.
27. Finally, using the text tool we just add in the poster title. Here we used some creative font styles for an easy stylized effect.
28. Great! Now you are done with our city fashion poster.

HG Designs Subscriber Area
Lots of high resolution goodies for graphic design including textures, photoshop brushes, seamless patterns and more.
$8/month
How To Design a Simple half-fold Business Brochure
This guide will help you design a simple half-fold brochure using Adobe Photoshop. We will be using a few basic tools and styles so it should not be too difficult.
1. Upon opening Adobe Photoshop, create a new document by going to File->New… In the window that opens. You will then be asked to enter the dimensions of your design. This can vary depending on the brochure size you wish to use but for the sake of our tutorial, let us use a standard 1100x600px design canvass. ALSO take note to raise the resolution value to at least 300ppi to ensure a crisp and clear brochure design. Also change the color mode to CMYK if you wish to prin
Designing simple but stylish Eco Themed brochures
While designing brochures is a bit tricky given its folded nature, creating a simple but very stylish eco themed brochure is still fairly easy using Photoshop. Although you don't have to have an expert skill set in Photoshop, you will need to be a bit more creative to fully maximize the tips and tricks you will learn here. So be sure to have an eager mind with a creative mindset and learning how to design a modern corporate "green" brochure in Adobe Photoshop should be a breeze.
1. The first task is to setup our document properly. In this tutorial, we will be creating a trifold brochure in a landscape letter sized paper. We chose this si
Designing a Psychological Thriller Themed Design
Creating a Psychological Thriller movie poster will require some special effects to fully emphasize the thrilling and psychological nature of your design's subject or theme. Here in this tutorial, you will learn some easy techniques on how to accomplish these effects. Let us get started.
1.The first thing that we need to do is to process our main image model. So we open the image and then start with taking out the background. By the way, this image came free from a very generous photographer located here: (http://b-e-c-k-y-stock.deviantart.com/). Now there are many ways to do this using Adobe Photoshop, and it all depends on how well prepare
Designing a modern colorful brochure cover
While there is the emphasis of being minimalist in modern print design, to fully create an impressive looking brochure cover these days, you need to pay attention to key subtle details. It is not just about the colors or your overall color scheme. It is about adding gradients appropriately, glow and shine effects that is reminiscent of digital web designs.
In this tutorial, we will show you how you can design a modern brochure cover that is simple, colorful, but fully impressive and trendy, matching the latest successful designs both in print and in web layouts. So carefully read the items below and start learning how you can design your own
© 2012 - 2024 tutorialphotoshop
Comments0
Join the community to add your comment. Already a deviant? Log In